Share



Published on 30 July, 2026
| Last Updated on 06 August, 2026

When single-instance virtual machines start reaching their limits during traffic spikes, managing containers individually on bare VMs quickly becomes an operational headache. That is usually the exact moment engineering teams transition to Kubernetes.
Kubernetes automates the deployment, scaling, and management of containerized applications. Instead of SSHing into individual nodes to start containers or fix failed processes, you declare your application’s desired state how many replicas it needs, its memory limits, and how traffic should route to it and Kubernetes maintains that state automatically.
While you can run Kubernetes on virtually any infrastructure, Google Cloud Platform (GCP) is a natural fit. Google originally created the internal system (Borg) that inspired Kubernetes, and its managed offering, Google Kubernetes Engine (GKE), offloads the heavy lifting of control plane maintenance, security patching, and node provisioning.
Unless you have strict on-premises compliance rules or custom kernel requirements, self-managing Kubernetes in production is rarely worth the operational cost. Running raw Kubernetes on Compute Engine VMs means you are personally responsible for:
GKE handles the control plane management for you, allowing you to focus purely on configuring workloads.
Before starting, make sure you have the following ready:
All GCP resources must belong to a project. Create a new project for this walkthrough:
gcloud projects create my-gke-demo-2026 --name="GKE Demo Project";
Note: Project IDs must be globally unique across all of Google Cloud.
Set this project as your CLI default so you don’t have to append –project to every subsequent command:
gcloud config set project my-gke-demo-2026
GCP disables most service APIs by default to prevent accidental resource usage. Enable the GKE API before attempting cluster creation:
gcloud services enable container.googleapis.com
Authenticate your local machine to interact with your GCP account:
gcloud auth login
Production Security Note: If you are automating this process inside a CI/CD pipeline (e.g., GitHub Actions or GitLab CI), avoid downloading static JSON service account keys. Long-lived keys pose a significant security risk if leaked. Instead, configure Workload Identity Federation to grant temporary, short-lived credentials to your pipeline.
GKE offers two operational modes:
Run the following command to provision a 3-node Standard cluster across a single zone:
gcloud container clusters create demo-cluster \
--zone=us-central1-a \
--machine-type=e2-medium \
--num-nodes=3
Cost Warning: Standard clusters incur costs for the underlying VM nodes (3 × e2-medium instances cost ~$70–$90/month) plus GKE’s cluster management fee (~$0.10/hour, or ~$72/month after any free-tier credits). Remember to run the cleanup step at the end of this guide to avoid lingering charges.
If you prefer to test with Autopilot mode (where you don’t manage node pools), use this command instead:
gcloud container clusters create-auto demo-autopilot-cluster \
--region=us-central1
Once cluster creation completes, pull down the cluster credentials into your local kubeconfig file:
gcloud container clusters get-credentials demo-cluster --zone=us-central1-a
Verify that your local kubectl context is pointing to the cluster and that all worker nodes are ready:
kubectl get nodes
You should see three nodes listed with a status of Ready.
To verify cluster functionality, deploy a standard NGINX web server using declarative YAML manifests.
Create a file named deployment.yaml:
apiVersion: apps/v1
kind: Deployment
metadata:
name: nginx-deployment
labels:
app: nginx
spec:
replicas: 2
selector:
matchLabels:
app: nginx
template:
metadata:
labels:
app: nginx
spec:
containers:
- name: nginx
image: nginx:1.27
ports:
- containerPort: 80
resources:
requests:
cpu: "100m""
memory: "128Mi"
limits:
cpu: "250m"
memory: "256Mi"
Apply the deployment:
kubectl apply -f deployment.yaml
Key Configuration Choices
To allow external web traffic to reach your application, expose the deployment through a Cloud Load Balancer.
Create a file named service.yaml:
apiVersion: v1
kind: Service
metadata:
 name: nginx-service
spec:
 type: LoadBalancer
 selector:
   app: nginx

ports:
  - port: 80
    targetPort: 80
Apply the service manifest:
kubectl apply -f service.yaml
Check the service status:
kubectl get service nginx-service --watch
After a minute or two, GCP will provision an external network load balancer and assign a public IP under the EXTERNAL-IP column. Open that IP address in your browser to verify the NGINX welcome page.
You can manually scale your replica count with a single command:
kubectl scale deployment nginx-deployment --replicas=5
For dynamic scaling based on real-time traffic, attach a Horizontal Pod Autoscaler (HPA):
kubectl autoscale deployment nginx-deployment --min=2 --max=10 --cpu-percent=70
This configuration instructs Kubernetes to maintain average CPU utilization near 70% by scaling the replica count between 2 and 10 Pods.
When troubleshooting Pods or deployment issues, rely on these fundamental commands:
# View application output logs
kubectl logs -l app=nginx

# Inspect cluster events and container failure reasons
kubectl describe pod -l app=nginx

# View chronological cluster events (useful for identifying scheduling failures)
kubectl get events --sort-by=.metadata.creationTimestamp
Troubleshooting Tip: If a Pod remains stuck in Pending status, check node resource availability (kubectl describe nodes). This usually means your resource requests exceed the available capacity on your worker nodes, requiring either smaller request limits or larger node pools.
To update your application image without dropping incoming connections:
kubectl set image deployment/nginx-deployment nginx=nginx:1.28
Kubernetes will incrementally replace old Pods with new ones. If the new image fails or crashes on startup, instantly roll back to the previous stable state:
kubectl rollout undo deployment/nginx-deployment
To avoid incurring ongoing charges for compute nodes and external load balancers, tear down the resources when you are finished testing:
# 1. Delete the service to release the Cloud Load Balancer IP
kubectl delete service nginx-service

# 2. Delete the cluster and worker VMs
gcloud container clusters delete demo-cluster --zone=us-central1-a
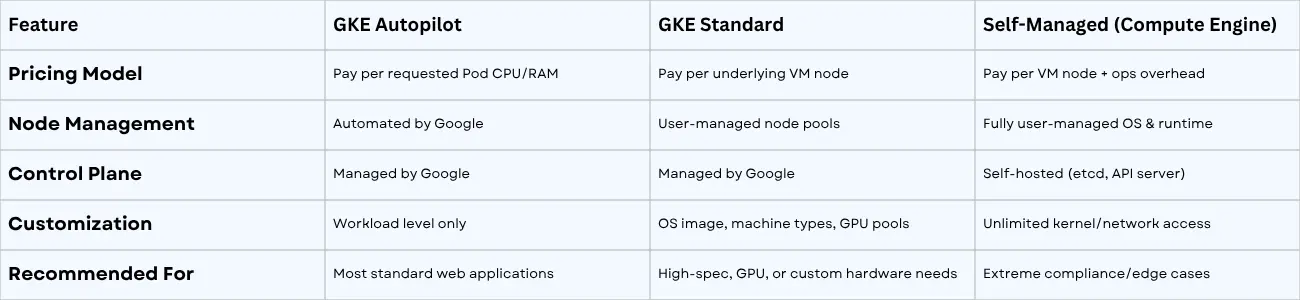
Architecture Comparison: Autopilot vs. Standard vs. Self-Managed
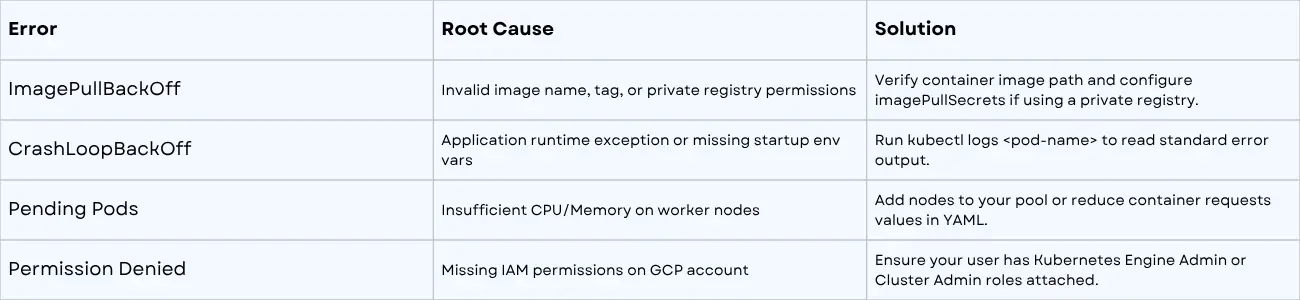
Common Troubleshooting Quick Reference
Setting up a cluster on Google Cloud gives you a resilient foundation for running containerized workloads without the maintenance headaches of raw infrastructure.
From here, the logical next steps for production readiness are:
Need expert assistance with Kubernetes, Google Cloud, or cloud-native application deployment? Our team can help you design, deploy, and manage scalable infrastructure. Contact us today: https://www.rlogical.com/contact/
Jatin Panchal is an innovation-driven entrepreneur, and the Founder & Managing Director of Rlogical Techsoft Pvt. Ltd. He believes modern leadership is driven by innovation, adaptability, and the transformative power of Artificial Intelligence. He focuses on helping businesses accelerate digital growth through AI-powered solutions, intelligent automation, Cloud, blockchain, IoT, and scalable enterprise technologies. With a strong strategic vision and future-focused mindset, he is passionate about building technology ecosystems that improve efficiency, drive innovation, and create long-term business value for global clients.
Global insights on technology trends, best practices, and digital transformation strategies.

A proven track record of high-impact deliveries across industries and technologies
Share with us. We'll assess its feasibility, suggest the right tech stack, and share a clear cost & timeline.
Years of Experience
Projects
Countries
Engineers
Verified Client Reviews
Industry Served