


Share


Published on 15 April, 2020
| Last Updated on 31 March, 2025
Jetpack is a suite of libraries, tools, and guidance to help developers write high-quality apps easier.
Prerequisites
To Implement any of the Android Jetpack Components it requires Android Studio version higher than 3.3 and androidx.* setup.
Jetpack comprises the androidx.* package libraries, unbundled from the platform APIs. This means that it offers backward compatibility and updated more frequently than the Android platform, making sure you always have access to the latest and greatest versions of the Jetpack components.
Getting Started Here:
Gradle Plugins
dependencies {
implementation “androidx.navigation:navigation-fragment:2.2.0”
implementation “androidx.navigation:navigation-ui:2.2.0”
}
apply plugin: “androidx.navigation.safeargs”
buildscript {
repositories {
google()
jcenter()
}
dependencies {
classpath ‘com.android.tools.build:gradle:3.5.3’
classpath “androidx.navigation:navigation-safe-args-gradle-plugin:2.2.0”
// NOTE: Do not place your application dependencies here; they belong
// in the individual module build.gradle files
}
}
It simplifies implementing navigation, while also helping you visualize your app’s navigation flow. The library provides a number of benefits, including:
– Automatic handling of fragment transactions
– Correctly handling up and back by default
– Default behaviors for animations and transitions
– Deep linking as a first class operation
– Implementing navigation UI patterns (like navigation drawers and bottom nav) with little additional work
– Type safety when passing information while navigating
– Android Studio tooling for visualizing and editing the navigation flow of an app
– Navigation Graph
– NavHostFragment (Layout XML view)
– NavController (Kotlin/Java object)
Navigation Graph :
This is a resource that contains all navigation-related information in one centralized location. This includes all the places in our app, known as destinations, and possible paths a user could take through the app.
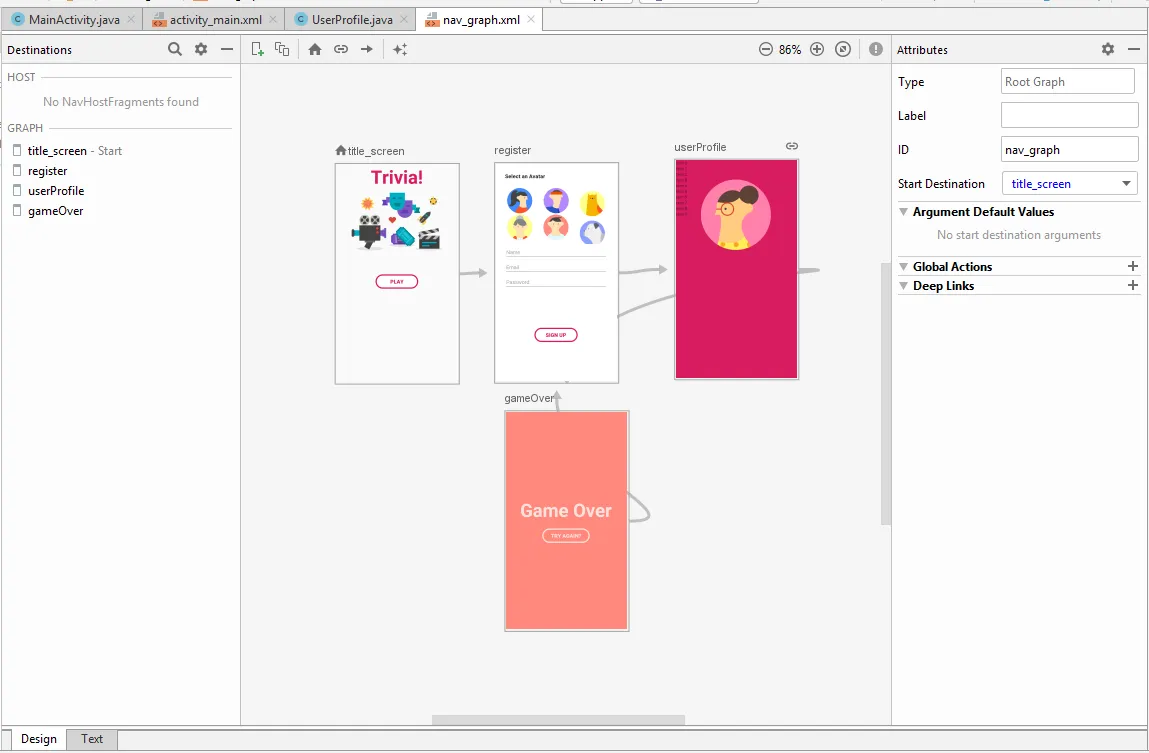
NavHostFragment :
This is a special widget you add to your layout. It displays different destinations from your Navigation Graph.
Navigation Controller :
This is an object that keeps track of the current position within the navigation graph. It orchestrates swapping destination content in the NavHostFragment as you move through a navigation graph.
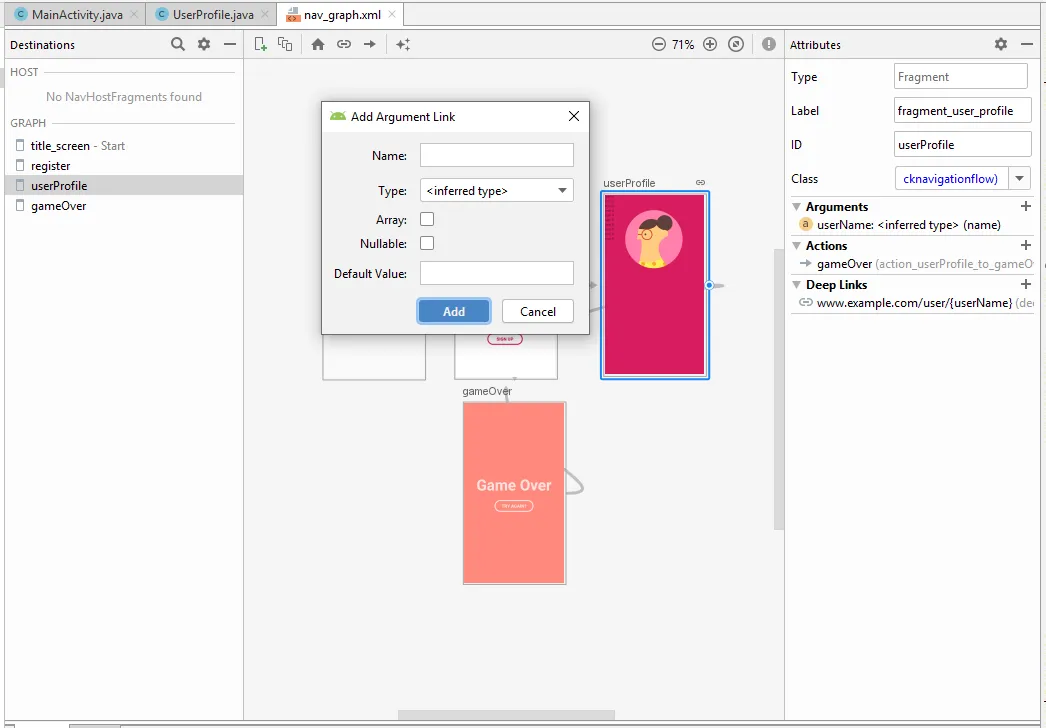
SafeArgs :
With navigation Component you also can pass arguments from one destination to another. For example, a user ID to fetch the details of a user from a remote server or local database. It is recommended to pass only small data between destinations. Like we said a user ID instead of the user itself.
To specify an argument on navigation editor do the following
– Click the Add (+) button on the Arguments panel
– Then add argument name, type, is it nullable and a default value (if needed)
– Then select your action and the argument
The following example shows you how to use these methods to set an argument and pass it to the navigate() method:
Button play_btn = view.findViewById(R.id.play_btn);
play_btn.setOnClickListener(new View.OnClickListener() {
@Override
public void onClick(View v) {
Navigation.findNavController(view).navigate(R.id.action_title_screen_to_register);
}
});
In our receiving destination’s code, use the getArguments() method to retrieve the bundle.
Deeplinks
With Navigation Component we can use a URI instead of an action to navigate.
Use the NavDeepLinkBuilder class to construct a PendingIntent, as shown in the example below. Note that if the provided context is not an Activity, the constructor uses PackageManager.getLaunchIntentForPackage() as the default activity to launch, if available.
With Navigation Component you can use a URI instead of an action to navigate.
PendingIntent pendingIntent = new NavDeepLinkBuilder(context)
.setGraph(R.navigation.nav_graph)
.setDestination(R.id.android)
.setArguments(args)
.createPendingIntent();
We can use the Navigation Editor to create an implicit deep link to a destination as follows:
In the Design tab of the Navigation Editor, select the destination for the deep link.
Click + in the Deep Links section of the Attributes panel.
In the Add Deep Link dialog that appears, enter a URI.
URIs without a scheme are assumed as either http or https. For example, www.google.com matches both http://www.google.com and https://www.google.com.
Placeholders in the form of {placeholder_name} match one or more characters. For example, http://www.example.com/users/{id} matches http://www.example.com/users/4. The Navigation component attempts to parse the placeholder values into appropriate types by matching placeholder names to the defined arguments that are defined for the deep link destination. If no argument with the same name is defined, a default String type is used for the argument value.
We can use the .* wildcard to match 0 or more characters.
(optional) Check Auto Verify to require Google to verify that you are the owner of the URI. For more information, see Verify Android App Links.
Click Add. A link icon appears above the selected destination to indicate that destination has a deep link.
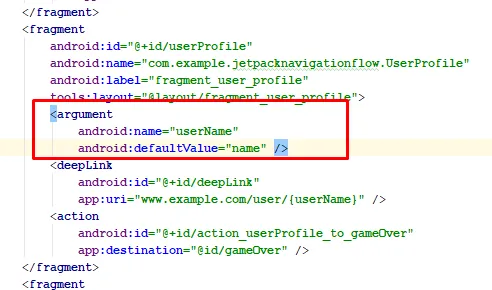
Click the Text tab to toggle to the XML view. A nested <deepLink> element has been added to the destination:
<deepLink
android:id=”@+id/deepLink”
app:uri=”www.example.com/user/{userName}” />

LiveData is introduced as lifecycle-aware data holder with the observer pattern. That means, When something is new in the data set it will notify. It automatically changes the view for the changes in the data set.
In large applications there can be two types of data source. Local Sqlite database, remote Rest APIs . With Live we can write code for observer these data sources for data changes and update views accordingly.
Ensures our UI matches our data state – It is based on observer pattern. So we’ll be notified every time the data changes instead of requesting the data each time from ViewModel
Avoid memory leaks – Observers bounded with life cycle and when lifecycle is destroyed LiveData object also destroy.
No more crashes due to stopped activities- If the observer’s lifecycle is inactive, such as in the case of an activity in the back stack, then it doesn’t receive any LiveData events.
No more manual lifecycle handling – UI components just observe relevant data and don’t stop or resume observation. LiveData automatically manages all of this since it’s aware of the relevant lifecycle status changes while observing.
Always up to date data – If a lifecycle becomes inactive, it receives the latest data upon becoming active again. For example, an activity that was in the background receives the latest data right after it returns to the foreground.
Manage all configuration changes –If an activity or fragment is recreated due to a configuration change, like device rotation, it immediately receives the latest available data.
Gradle Plugins
dependencies {
implementation “android.arch.lifecycle:extensions:1.1.1”
annotationProcessor “android.arch.lifecycle:compiler:1.1.1”
}
Create an instance of LiveData to hold a certain type of data. This is usually done within your ViewModel class.
Create an Observer object that defines the onChanged() method, which controls what happens when the LiveData object’s held data changes. You usually create an Observer object in a UI controller, such as an activity or fragment.
Attach the Observer object to the LiveData object using the observe() method. The observe() method takes a LifecycleOwner object. This subscribes the Observer object to the LiveData object so that it is notified of changes.
public class MainViewModel extends AndroidViewModel {
private WallpapersRepo movieRepository;
public MainViewModel(@NonNull Application application) {
super(application);
movieRepository = new WallpapersRepo(application);
}
public LiveData<List<Wallpapers>> getAllBlog(CustomProgressDialog customProgressDialog) {
LiveData<List<Wallpapers>> data = new LiveData<List<Wallpapers>>() {};
customProgressDialog.show();
return movieRepository.getMutableLiveData(customProgressDialog) == null ? data :
movieRepository.getMutableLiveData(customProgressDialog);
}
}
Repository for interacting to LiveData
public class WallpapersRepo {
private ArrayList<Wallpapers> movies = new ArrayList<>();
private MutableLiveData<List<Wallpapers>> mutableLiveData = new MutableLiveData<>();
private Application application;
public WallpapersRepo(Application application) {
this.application = application;
}
public MutableLiveData<List<Wallpapers>> getMutableLiveData(CustomProgressDialog customProgressDialog) {
final ApiManager apiManager = new ApiManager();
apiManager.createService(RestApiInterface.class, null).getWallPaperData().enqueue(new Callback<JsonObject>() {
@Override
public void onResponse(@NonNull Call<JsonObject> call, @NonNull Response<JsonObject> response) {
try {
customProgressDialog.cancel();
Log.d(“”, “callSearchMember response :: ” + response);
if (response.body() != null) {
JSONObject jsonObjectResponse = new JSONObject(response.body().toString());
apiManager.parseJSONOResponse(jsonObjectResponse);
WallPaper mBlogWrapper = parseData(jsonObjectResponse.toString());
if (mBlogWrapper != null && mBlogWrapper.getWallpapers() != null) {
movies = mBlogWrapper.getWallpapers();
mutableLiveData.setValue(movies);
}
}
} catch (JSONException e) {
e.printStackTrace();
}
}
@Override
public void onFailure(@NonNull Call<JsonObject> call, @NonNull Throwable t) {
Log.d(“Failed”, “Internal Server error!”);
}
});
return mutableLiveData;
}
private WallPaper parseData(String response) {
try {
Gson gson = new GsonBuilder().create();
return gson.fromJson(response, WallPaper.class);
} catch (Exception e) {
e.printStackTrace();
return null;
}
}
}
it receives the most recent value from the LiveData objects it’s observing. This only occurs if the LiveData object to be observed has been set.
Generally, LiveData delivers updates only when data changes, and only to active observers. An exception to this behavior is that observers also receive an update when they change from an inactive to an active state. Furthermore, if the observer changes from inactive to active a second time, it only receives an update if the value has changed since the last time it became active.
mainViewModel.getAllBlog(customProgressDialog).observe(getActivity(), blogList -> {
swipeRefresh.setRefreshing(false);
prepareRecyclerView(blogList);
});
In this blog we explained about Android Jetpack and know about Android Jetpack Components & Architecture. This way Android Jetpack helps Android app developers and we should start using it.
Rahul Panchal is a visionary technology entrepreneur and the Founder & Managing Director of Rlogical Techsoft Pvt. Ltd. Passionate about the power of Artificial Intelligence, he focuses on helping businesses transform through AI-driven solutions, intelligent automation, and data-centric digital ecosystems. Alongside AI, his expertise spans scalable web and mobile platforms, Cloud, IoT, and modern enterprise technologies enabling organizations to innovate faster, optimize operations, and build future-ready digital products with real business impact.
Global insights on technology trends, best practices, and digital transformation strategies.
A proven track record of high-impact deliveries across industries and technologies
Share with us. We'll assess its feasibility, suggest the right tech stack, and share a clear cost & timeline.
Years of Experience
Projects
Countries
Engineers
Verified Client Reviews
Industry Served